Baking Makeup Method.
For most of us baking means mixing up a fabulous dessert and popping into the oven on a high heat , but what happens when baking turns into something you do on your face? Seems a wee bit dangerous if you ask me. However, there was no danger done to me during the making of this look. In fact, the end result made me as happy as a delicious cupcake would make me, and I hope it does for you as well.
As you know we live in the day of the "selfie" and 4k camera. Technology is through the roof and makeup is advancing along side that. The baking process is actually old school but like all good things, they come back around. Baking is utilized to create a flawless, long lasting makeup application. Celebrity approved, I asked Kim K. Okay, that wasn't true but I believe everything I read and IG confirmed. It's a thing and it's spreading like wildfire. So, here's how:
1.Start with clean moisturized skin, especially under eye area. I personally use the Algenist Multi Pore Correcting moisturizer, it's a gel & super light weight. It contains ingrediants to help diminish the look of pores and imperfections and is great for oily skin. It absorbs into the skin quickly and works well with my choice of foundation.
2. Apply your primer/liquid foundation. Any will be perfect. I apply with a dampened beauty blender. Drugstore- Maybelline Super Stay foundation (again I am oily and love a full coverage) Sephora- Kat Von D Lock It primer/liquid foundation (super matte/full coverage).
3. In all areas you'd like to hilight, use a concealer a few shades lighter than your skin. I typially apply down the center of my nose, in a large "v" under the eyes, center of forehead, and chin. Drugstore- Maybelline Artist Pro concealer. Sephora- Just launched new creamy concealers and they are the bees, and offer a wide selection of shades! Blend out with beauty blender, dampened.
4. Apply cream contour. This can be done with a few shades darker than your skin tone foundation, concealer, or contour stick. I apply on outer edge of forehead close to hairline, sides of nose, cheekbones, neck, and a tinge on my chin. Again blended with a dampened beauty blender. I haven't ever tried a drugstore option for this but LOVE the Sephora brand contour/hilight duo sticks as well as the Tarte sculpt. I own those two. I love a deep contrast.
5. After those steps are complete. Take your favorite loose setting powder, and with your damp beauty blender add an excessive amount to the areas you hilighted. You will want to see it "piled" up in those areas. Think of your face like a cake, every ingredient counts and the flour is the bulk of it, but when the cookies come out the flour can't be seen. My photo on the left showcases how exessive to get with it! I used the Cover FX loose setting powder in light, found at Sephora. It is my jam. I also recently purchased the banana powder in Sephora collection. I love it, but I got the pressed formula. It works okay, but loose is much easier. I have yet to try a drugstore loose powder for this, but plan to eventually.
6. Finish the rest of your makeup. This is giving your face it's time to bake/cook fully. The heat from your skin, and the "tack" from the rest of the makeup beneath allows the excessive amount of powder to penetrate into he pores, lines, as well as set the makeup beneath. The setting powder, is light *DO NOT USE A DARK POWDER* (it needs to be cohesive with the light concealer color you used). This allows the hilighted area to be very prominent. When finishing my makeup, I add a layer of powder contour with my Kat Von D shade and light pallette using my Nars ita brush. I haven't tried drugstore versions of contour yet, but know a few are launching. I do basically all my makeip asides blush, lips, and setting spray.
7. Now that your eyes are sparking like diamonds, and you're feeling glamorous it is time to pull that dessert out of the oven aka with a makeup brush dust off the excess powder from hilighted areas. You will see over the course of the last 10-20 minutes the amount of powder looks decreased. JOB WELL DONE. So, you are solely just dusting off what didn't "sink in."
8. Now add your sprinkles. Blush, if you had areas needing contour, lips. In this photo I am wearing a KVD blush and a Stila liquid lipstick. The blush is no longer, rats & the lipstick well, you'll know it when you see it!
9. Once complete add your setting spray. I am OBSESSED with the Model in a Bottle Sensitive Matte setting spray. It keeps my makeup lasting all day, no breaking apart! I have a review on IG.
10. Take a photo & enjoy your hard work. Also, get out and show it off you glamour doll, shall I call you Kim K? (or insert name of your glamor love) Also, post and tag me! I'd love to see ♡ Oh, and go buy yourself a cupcake because I can bet all this "baking" talk made you want one. Or is that just me?
Either way,
Thank you for reading.
Stay gorgeous, dolls.
As you know we live in the day of the "selfie" and 4k camera. Technology is through the roof and makeup is advancing along side that. The baking process is actually old school but like all good things, they come back around. Baking is utilized to create a flawless, long lasting makeup application. Celebrity approved, I asked Kim K. Okay, that wasn't true but I believe everything I read and IG confirmed. It's a thing and it's spreading like wildfire. So, here's how:
1.Start with clean moisturized skin, especially under eye area. I personally use the Algenist Multi Pore Correcting moisturizer, it's a gel & super light weight. It contains ingrediants to help diminish the look of pores and imperfections and is great for oily skin. It absorbs into the skin quickly and works well with my choice of foundation.
2. Apply your primer/liquid foundation. Any will be perfect. I apply with a dampened beauty blender. Drugstore- Maybelline Super Stay foundation (again I am oily and love a full coverage) Sephora- Kat Von D Lock It primer/liquid foundation (super matte/full coverage).
3. In all areas you'd like to hilight, use a concealer a few shades lighter than your skin. I typially apply down the center of my nose, in a large "v" under the eyes, center of forehead, and chin. Drugstore- Maybelline Artist Pro concealer. Sephora- Just launched new creamy concealers and they are the bees, and offer a wide selection of shades! Blend out with beauty blender, dampened.
4. Apply cream contour. This can be done with a few shades darker than your skin tone foundation, concealer, or contour stick. I apply on outer edge of forehead close to hairline, sides of nose, cheekbones, neck, and a tinge on my chin. Again blended with a dampened beauty blender. I haven't ever tried a drugstore option for this but LOVE the Sephora brand contour/hilight duo sticks as well as the Tarte sculpt. I own those two. I love a deep contrast.
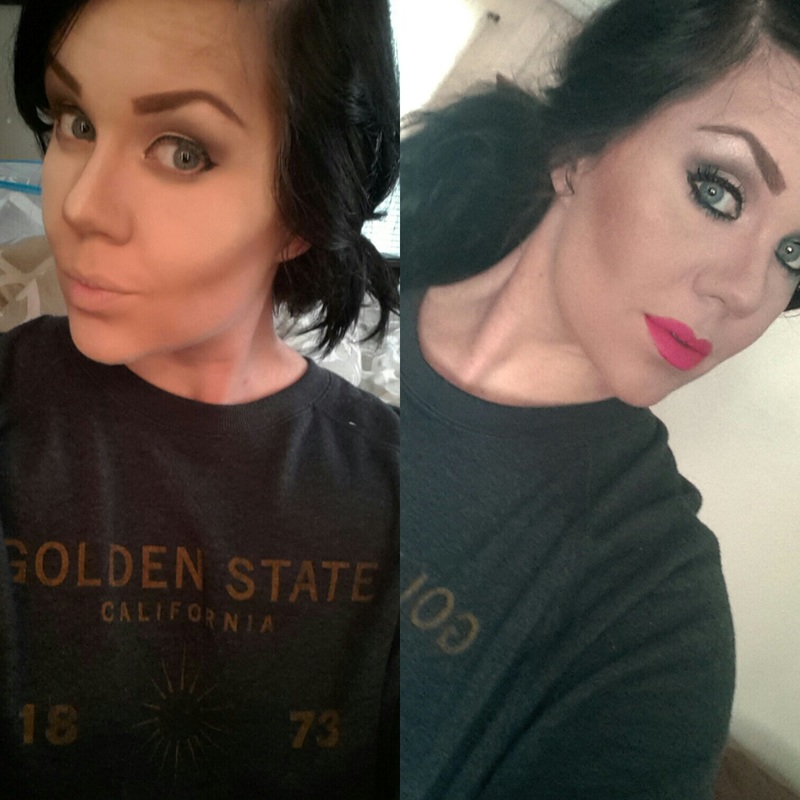
5. After those steps are complete. Take your favorite loose setting powder, and with your damp beauty blender add an excessive amount to the areas you hilighted. You will want to see it "piled" up in those areas. Think of your face like a cake, every ingredient counts and the flour is the bulk of it, but when the cookies come out the flour can't be seen. My photo on the left showcases how exessive to get with it! I used the Cover FX loose setting powder in light, found at Sephora. It is my jam. I also recently purchased the banana powder in Sephora collection. I love it, but I got the pressed formula. It works okay, but loose is much easier. I have yet to try a drugstore loose powder for this, but plan to eventually.
6. Finish the rest of your makeup. This is giving your face it's time to bake/cook fully. The heat from your skin, and the "tack" from the rest of the makeup beneath allows the excessive amount of powder to penetrate into he pores, lines, as well as set the makeup beneath. The setting powder, is light *DO NOT USE A DARK POWDER* (it needs to be cohesive with the light concealer color you used). This allows the hilighted area to be very prominent. When finishing my makeup, I add a layer of powder contour with my Kat Von D shade and light pallette using my Nars ita brush. I haven't tried drugstore versions of contour yet, but know a few are launching. I do basically all my makeip asides blush, lips, and setting spray.
7. Now that your eyes are sparking like diamonds, and you're feeling glamorous it is time to pull that dessert out of the oven aka with a makeup brush dust off the excess powder from hilighted areas. You will see over the course of the last 10-20 minutes the amount of powder looks decreased. JOB WELL DONE. So, you are solely just dusting off what didn't "sink in."
8. Now add your sprinkles. Blush, if you had areas needing contour, lips. In this photo I am wearing a KVD blush and a Stila liquid lipstick. The blush is no longer, rats & the lipstick well, you'll know it when you see it!
9. Once complete add your setting spray. I am OBSESSED with the Model in a Bottle Sensitive Matte setting spray. It keeps my makeup lasting all day, no breaking apart! I have a review on IG.
10. Take a photo & enjoy your hard work. Also, get out and show it off you glamour doll, shall I call you Kim K? (or insert name of your glamor love) Also, post and tag me! I'd love to see ♡ Oh, and go buy yourself a cupcake because I can bet all this "baking" talk made you want one. Or is that just me?
Either way,
Thank you for reading.
Stay gorgeous, dolls.
 RSS Feed
